How to Childproof Your Windows: Safety Locks, Restrictors, and Best Practices


To childproof your windows, limit how far each one can open, add locks or restrictors that match the window style, use guards where a physical barrier is appropriate, move climbable furniture away, and choose cordless window coverings.
Those five steps work as one system rather than a menu to choose from. A lock on its own forces a choice between fresh air and safety, and a restrictor on its own does nothing about the dresser a toddler can climb. Screens play no part at all, because they are built to keep insects out rather than to hold a child in. This guide covers the devices, where each one belongs, how to keep emergency escape intact, and what to recheck as your child grows.
Key Takeaways
- Falls from windows and balconies are among the most likely causes of child falls resulting in hospital admission, according to the Public Health Agency of Canada.
- Fraser Health advises limiting window openings to no more than 10 centimetres, since a child can fit through a gap of about 12 centimetres.
- Insect screens are not fall protection and should never be treated as a barrier.
- Locks, restrictors, and guards solve different problems, so most homes need a combination rather than one device everywhere.
- Any device on an escape window must be released quickly by an adult, without tools and without a key.
- Health Canada advises that the safest window coverings are the ones with no cords you can see or touch.
- Furniture placement matters as much as hardware, because a child who can climb can reach a window that looks out of reach.
Why does window child safety matter in homes with young children?
Window falls are uncommon compared with everyday tumbles, but they are among the most serious falls a young child can have.
Falls are the most common reason young children end up in Canadian emergency departments, and the vast majority of these visits are minor. Height changes that picture completely. In its review of fall-related injuries among children aged 0 to 9 , the Public Health Agency of Canada reports that falls from windows and balconies were the most likely to result in hospital admission, with the described circumstances including children pushing through a window screen and climbing on furniture or a ledge. That is the whole risk in one sentence: the event is rare, the consequences are not, and the sequence leading up to it repeats itself.
How quickly the situation develops is the second thing worth understanding. A window that sat safely out of reach last season becomes reachable the moment a child learns to climb onto a bed, or a toy box, and that change usually arrives without notice. Warm weather makes open windows far more likely, and an open window with a screen in it reads as closed to a small child. None of this reflects on a parent, since these incidents occur in supervised homes within the few seconds it takes to answer the door.
There is also a practical reason to treat this as a hardware question rather than a supervision question. A device works the same way at bedtime, during a phone call, and when a visiting relative is in charge. It does not get tired or forget, and once it is installed correctly, it keeps working with almost no effort on your part. That is why pediatric and public health guidance across Canada leads with physical measures such as stops, restrictors, and guards, then layers supervision on top of them.

Which windows create the greatest risks for toddlers and young children?
The riskiest windows are the ones a child can reach, open, and climb through, which usually means a low sill on an upper floor.
Sill height is the first factor. When the openable portion of a window sits low to the floor, the gap lands at chest height for a toddler, and a child leaning on it is already partly through. Upper storeys raise the consequences of that same gap, which is why bedrooms and playrooms above ground level come first in any plan. Hardware height matters too, because a child who can reach a handle or a crank will eventually work out what it does.
High-risk locations in a typical home
Bedrooms head the list, since children spend unsupervised time there and the furniture is usually close to the walls. Playrooms follow for the same reason, with the added problem that toy storage doubles as a step. Hallway and stairwell landing windows are easy to overlook because nobody lingers there, yet they often combine a low opening with a hard landing below. Bathrooms deserve a look as well, since a closed toilet lid or a step stool sits within reach of the window in many layouts.
Signs a window needs extra protection
Some signals stand out once you go looking for them. Any window whose opening section starts below your child's shoulder height belongs on the list, as does any upper-floor window that opens wide in a single motion. Hardware that turns easily, a sash that slides under light pressure, and a sill deep enough to kneel on all point the same way. Add any window where you have already found a chair, a stool, or a pile of toys nearby, because that indicates the child has been exploring the spot rather than passing by. Fraser Health makes a related point that catches many parents out: children often begin climbing before they can walk.
What is the safest way to childproof windows without giving up ventilation?
Limit the opening rather than sealing the window, so air still moves while the gap remains too small for it to pass through.
A specific number helps here. Fraser Health advises that window safety devices should prevent openings of more than 10 centimetres and notes that children can fit through spaces as small as about 12 centimetres. Ten centimetres ventilates a bedroom overnight and is far too little for a child to climb through, which is why it has become the working benchmark for stops and restrictors. The same guidance stresses that whatever you fit must still allow a safe release in a fire. Purpose-built devices are generally tested to ASTM F2090 , the standard covering window fall prevention devices with emergency escape release mechanisms, and that reference is worth looking for on the packaging.
Layering is what makes this practical rather than restrictive. Windows that never need to open can simply stay locked, which costs nothing and removes them from the problem. Windows you rely on for airflow get a restrictor or stop so the opening is capped. Windows where a physical barrier suits the room better, often on the upper floor of an older home, get a guard instead. The mix depends on the storey, the room, the way the window operates, and whether that opening is part of your escape plan.
The three device families address different problems, and the table below shows where each fits before you start buying hardware.
| Device | What it does | Ventilation while in use | Best suited to |
|---|---|---|---|
| Lock or sash lock | Holds the window fully closed | None | Windows that rarely or never need to open |
| Restrictor or window stop | Caps how far the sash can travel | Yes, within the capped opening | Bedrooms and living areas that need daily airflow |
| Friction hinges | Add built-in resistance so the sash slows and holds partway instead of swinging open | Yes, the window holds at any chosen opening | Casement and awning windows that need controlled, hold-open airflow |
| Window guard | Places a physical barrier across the opening | Yes, the window opens behind it | Upper-storey windows where a barrier suits the room |
| Lock plus restrictor | Locked when closed, capped when open | Yes, whenever the restrictor is engaged | Rooms whose use changes through the day |
How do window restrictors and limiters work, and where should they be installed?
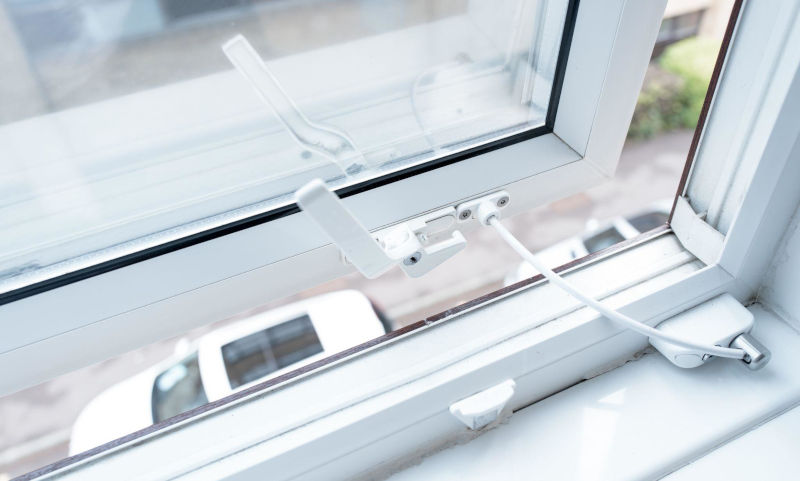
Window restrictors are designed to balance ventilation with a safer opening, but the right approach depends on how each window is used. Before choosing a restrictor, consider the window's opening style, location, and how often it needs to be opened fully.
The main types of restrictors
Cable restrictors run a short steel cable between the sash and the frame and halt the travel once the cable pulls taut, which suits sliding and hung windows. Friction stops and track stops clamp into the channel and physically block the sash beyond a set point, and they are usually the quickest to fit. Lockable versions add a key or a button that an adult can use to release the device and fully open the window when needed. Our guide to window restrictors goes further into how each type behaves and how to match one to the way your windows actually operate.
Where to fit them first
Work in order of risk rather than room by room. Upper-floor bedrooms come first, followed by any window with a low sill regardless of storey, then playrooms, hallways, and stairwell landings. Ground-floor windows generally pose less fall risk, though they may still be worth restricting for security reasons. Doing the highest-risk openings in one afternoon protects more than spreading the same effort evenly across the house over a month.
Getting the installation right
A restrictor is only as strong as what it is fastened to. Screws driven into thin trim, soft or swollen material, or a frame that has already worked loose will not hold against a determined push, and a device that looks installed but is not anchored gives false confidence. Follow the manufacturer's instructions for your specific window style rather than improvising a mounting point, since the load path differs between hinged and sliding sashes. Once it is fitted, push the sash firmly to test it, then operate the release and confirm the device re-engages properly afterwards.
“The question I ask parents first is which windows they actually want to open, because that one answer sorts the whole house. Windows nobody uses can simply stay locked, and the ones you rely on for fresh air get a restrictor set to a safe opening. Deciding that up front is far easier than retrofitting one room at a time after something has given you a scare.” Helen Sin, Consumer Success Manager at Canadian Choice Windows & Doors™
Are childproof window locks enough to protect a young child?
Locks are excellent on windows that stay shut and much weaker as a whole-home strategy, because families open windows.
A lock does one job very well: it holds the sash closed and requires a deliberate adult action to release. On a window you never open, that is a complete answer at almost no cost. The weakness shows up in summer, when the same lock has to come off for airflow, and the protection disappears exactly when the risk is highest. Keyed locks add a further complication because a key stored safely away from children is also one nobody can find in a hurry.
When to combine a lock with another device
Pairing solves the summer problem. The lock secures the window overnight and whenever the room is empty, while the restrictor caps the opening when the window is in use, so there is never a moment when safety depends on someone remembering. It also removes the temptation to leave a window wide open because the alternative felt like a sealed room. If you are buying only one device for a child's bedroom, the restrictor is usually the more useful of the two, precisely because it withstands everyday use.
When should you use window guards instead of locks or restrictors?
Choose a guard when you want a physical barrier at the opening rather than a limit on how far the sash can move.
A guard works like a gate in front of the window, with bars spaced too closely for a child to pass through, and Fraser Health recommends guards on windows above ground level. Because the barrier sits in front of the opening, the window itself can open fully behind it, which suits rooms where you want more airflow than a capped gap allows. Guards also help where a restrictor is awkward to mount, and where a child is old enough and determined enough to keep working at a stop. In rental housing, Parachute notes that some municipalities have window safety bylaws that may oblige a landlord to provide stops or guards, so it is worth asking rather than assuming.
Emergency release is the deciding feature
Parachute advises choosing guards with a release mechanism so the window can be opened fully in an emergency, and the same logic applies to any device on an escape window. The release has to work for an adult or older child without tools, without hunting for a key, and without special knowledge, because a fire is the worst possible moment to discover otherwise. Practise it once after installation and again each year, since a mechanism you have never operated is one you will fumble under stress. Devices meeting ASTM F2090 are designed around exactly this balance, holding against a child's push while opening under deliberate adult action.
Why should you never rely on a window screen for child safety?
A screen is built to keep insects out, not to hold a child in, and it will not take the weight of a leaning toddler.
Insect screens are held by light spline, small clips, or friction alone, and the mesh itself tears under very little force. A child leaning against one can push straight through it, and the frame can pop out of its track entirely. This is not a defect, because the screen is doing the job it was designed for, and no manufacturer presents one as a barrier. The trouble is that it looks like a barrier, which is why the Public Health Agency of Canada's summary of window and balcony falls lists children pushing through screens as one of the circumstances behind these incidents.
The practical response is simple. Treat any window with a screen as an open window, and say so out loud in front of your children so that nobody in the household picks up the bad habit. If a room needs airflow, take the protection from a restrictor, a stop, or a guard, and let the screen carry on with insect duty. It is worth repeating this to grandparents, babysitters, and anyone else who spends time in the home because the misconception about screens is remarkably common.
How should furniture and room layout change around windows?
Move anything climbable away from windows, because most window falls begin with a child getting up to the sill rather than reaching it directly.
Think of it as removing the staircase rather than guarding the summit. Fraser Health specifically recommends moving household items away from windows so children are not encouraged to climb up and look out, and that advice is far easier to follow when you are arranging a room than a year later.
Nursery and bedroom layout
A bed pushed under a window is the most common arrangement to change, and a crib or change table beside it is the version that catches on with new parents, since an infant who cannot yet walk may already be pulling themselves upright. Dressers, nightstands, and low bookshelves serve the same purpose from a child's perspective, as does a window seat or a deep sill. Aim for a clear zone in front of every accessible window with nothing in it that will hold a child's weight, and check the view from about a metre off the floor, because the route a child sees is rarely the one an adult pictures.
Reassessing as your child becomes more mobile
A room that was safe for a six-month-old often is not safe for the same child at fourteen months, and the change frequently coincides with the move from a crib to a bed. Review the layout after any furniture rearrangement, after a birthday that brings large toys into the room, and whenever your child masters a new physical skill. The items below are the ones most often found beside a window during a first walkthrough, and each is worth relocating before you rely on hardware alone.
- Beds, cribs, and change tables positioned against or beside an accessible window.
- Dressers, nightstands, and low bookshelves within arm's reach of the sill.
- Toy boxes, storage bins, and ottomans a child can climb onto or drag.
- Step stools, folding chairs, and laundry baskets stored in the room.
- Radiator covers and window seats that create a ready-made platform.
Which window child safety measures work best for casement, sliding, and hung windows?
The right device depends on how the sash moves, since a crank, a slider, and a vertical sash each fail differently.
Casement windows swing outward on hinges under a crank, so the control point is the operator arm or a chain restrictor that limits the arc, and they seal tightly when locked. Awning windows behave much the same way while shedding rain at a small opening angle, which makes them forgiving in a child's bedroom. Sliding windows travel horizontally along a track, so both the track stops and the cable restrictors work and are usually simple to fit. Vertical sashes are the case where the extra option appears, because double-hung windows can often be ventilated from the top sash while the bottom stays closed and stopped. Matching the device to the mechanism is what keeps hardware from being defeated or from binding the window.
The summary below pairs each operating style with the devices that suit it and the ventilation habit that tends to cause the least friction day to day.
| Window style | How it opens | Devices that suit it | Ventilation approach |
|---|---|---|---|
| Casement | Swings outward on hinges, crank-operated | Limited operator arm, chain restrictor, sash lock | Crank to the restrictor stop rather than fully open |
| Awning | Hinged at the top, opens outward at the bottom | Limited operator arm, chain restrictor | A small angle still moves air and sheds rain |
| Sliding | Sash travels horizontally in a track | Track stop, cable restrictor, keyed sash lock | Cap the slide at a safe gap, lock when unused |
| Single hung | Bottom sash raises vertically | Sash stop, cable restrictor | Raise only to the stop and keep the area below clear |
| Double hung | Both sashes move vertically | Sash stops on both sashes, cable restrictor | Open the top sash where the design allows |
How can cordless window coverings remove another hidden child-safety hazard?
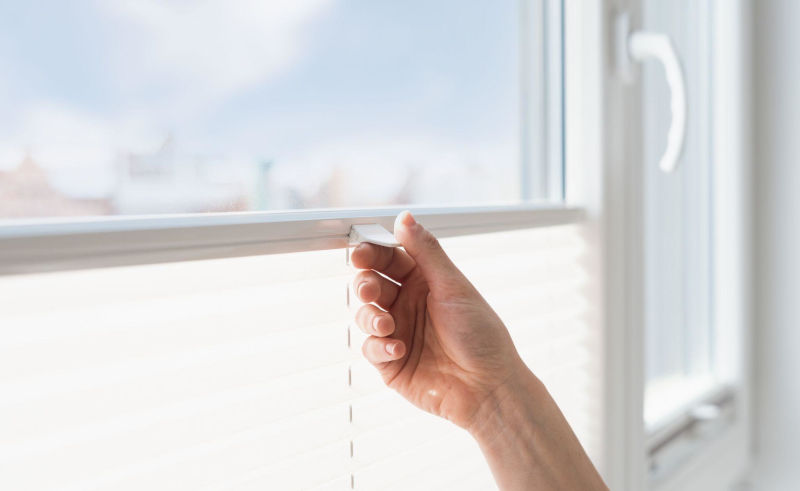
Cordless coverings make window areas easier to manage by removing a feature that can be difficult to keep consistently out of a child’s reach. They are especially useful in rooms where children spend a lot of time, helping make everyday window safety less dependent on constant supervision.
Why accessible cords are dangerous at this age
Long cords and bead chains on blinds and shades can form loops, and a young child can become entangled quickly and almost silently. Health Canada is direct about the answer, advising that the safest window coverings are those with no cords you can see or touch, and encouraging parents to switch to cordless options, starting with children's bedrooms and play areas. The risk does not depend on carelessness, which is the part parents most often underestimate, since incidents have happened in homes where an adult was present.
What to do about older coverings
The Corded Window Coverings Regulations came into force on 1 May 2021 and restrict the length of reachable cords and the size of loops on products sold in Canada, so anything bought new should already meet those requirements. Coverings installed years earlier are the ones most likely to still carry the hazard, along with any that came with the home when you moved in and whose age you do not know. If replacing everything at once is not realistic, sequence the work by room, starting with the room where children sleep and play. Until a corded covering is gone, keep cords high and out of reach and keep cribs, beds, and chairs well away from them.
What should parents check about emergency egress and quick-release hardware?
Identify which windows are meant for emergency escape before you fit anything permanent to them.
Bedrooms in Canadian homes commonly include a window intended to serve as an escape route, and a safety device that cannot be released quickly turns that route into a wall. The requirement is not that the window be easy for a child to open, but that an adult or older child can release the device without tools, a key, or instructions. Walk the house with that question in mind, note which openings are on your escape plan, and confirm that every device on those windows has a release you have personally operated.
Two habits keep this reliable over time. Test each release when you install it and again at least once a year, ideally alongside your smoke alarm check, so the mechanism stays familiar and any seized hardware turns up early. Then tell everyone who cares for your children which windows are escape windows and how the release works, because information held by one parent is not a plan. If a device on an escape window can only be released with a key, either move that key to a fixed spot every adult knows or swap the device for a button-release version.
How should you inspect window child safety devices as your child grows?
Check the hardware on a regular schedule and reassess the whole room whenever your child reaches a new physical milestone.
Devices loosen with use. Screws back out slightly under the vibration of a sash that opens and closes hundreds of times, cables fray where they anchor, and plastic components grow brittle after several seasons of sun and cold. A short monthly check catches all of that long before it matters, and it takes only a few minutes once you know where to look. Pair it with a routine you already have, such as the day you change furnace filters, so it does not rely on memory. The points below are the ones that actually fail in service.
- Push firmly on each restricted sash to confirm the device holds, and the mounting is solid.
- Check screws and anchors for movement, and inspect cables and clamps for fraying or corrosion.
- Operate every emergency release by hand, then reset it and confirm it re-engages.
- Look for new climbable items that have appeared near a window since the last check.
- Confirm handles and cranks are still out of reach given your child's current height.
- Inspect any remaining corded coverings for reachable cords or newly formed loops.
Milestones that should trigger a fresh look
The developmental side matters as much as the hardware. A child who has just learned to climb or has moved from a crib to a bed has overnight changed the risk profile of every room. Growth brings handles and cranks into reach that sat comfortably above them a few months earlier, and a new sibling often brings furniture back against the walls. Reassess after each of those changes rather than on a fixed annual date, and expect the answer to keep shifting for the first several years.
When does replacing an older window make more sense than adding childproofing hardware?
Childproofing hardware is usually a practical way to improve an otherwise sound window, but it is not a substitute for a window that has reached the end of its useful life. The key is to assess the condition and reliability of the entire unit before deciding whether an add-on solution is sufficient.
When hardware will not hold
Some windows cannot be made safe with an add-on device. Frames that have rotted, warped, or pulled away from the opening give a restrictor nothing solid to anchor into, and a device mounted in failing material offers reassurance without protection. Sashes that will not stay where they are set, broken or mismatched hardware, and units painted shut so thoroughly that they cannot be opened in an emergency all point the same way. Older units with unusual track profiles sometimes have no compatible device available at all, which is worth confirming before you buy three of the wrong thing. On a modern unit, compatible locking and restricting hardware can be specified as part of the order instead of added afterwards, and our tips for replacing windows cover what else to settle before you commit to a quote.
How local conditions change the assessment
Where you live shapes both what fails and when you can book the work. A window installer in Halifax deals with coastal damp and salt-laden air, which corrodes hardware and causes older frames to swell until a sash no longer stays where it is set. Further west, an Edmonton window company sees the opposite problem more often: repeated deep freezing and thawing gradually loosen fasteners and leave a restrictor anchored in a widened hole. Seasonal demand varies across markets, too, so scheduling an assessment ahead of the busy stretch usually gives you more control over the date. Vinyl frames hold up well in both settings because they resist moisture, maintain their shape, and securely accept hardware over a long service life.
“When I look at a child's room, I am checking whether the window can actually hold the hardware, not just whether a device will fit. Anchoring a restrictor into a frame that has already softened gives a family false confidence, and that is worse than fitting nothing at all. If the unit is sound, we secure it. If it is not, I would rather say so and talk about the window itself.” Tony Wong, Project Manager at Canadian Choice Windows & Doors™
What are the key childproof window safety takeaways?
Childproofing windows comes down to a layered approach rather than a single purchase. Keep windows locked where they do not need to open, cap openings with a restrictor or stop airflow where you want it, and use a guard where a physical barrier suits the room better. Never treat an insect screen as protection; clear climbable furniture away from every accessible window; and replace corded coverings with cordless ones, starting in bedrooms and play areas. Keep emergency escape intact by confirming that every device on an escape window releases quickly for an adult, then recheck the hardware and the room each time your child reaches a new stage, because the risk changes every time they do.
If your windows are older, damaged, or simply will not accept a device that holds, an assessment is worth more than another trip to the hardware store. Canadian Choice Windows & Doors™ can look at what you have, tell you plainly whether hardware will do the job, and set out the options if it will not. You can request a free window estimate and talk through the rooms that concern you most, with no pressure to decide on the spot.
Frequently Asked Questions
How far should a window open in a home with young children?
Guidance from Fraser Health puts the limit at no more than 10 centimetres, because children can fit through a gap of roughly 12 centimetres. That opening still ventilates a bedroom while staying too small to climb through, and restrictors and stops are designed to hold a sash at about that distance.
Can a window screen stop a child from falling?
No. Screens keep insects out and are held in place by light clips or spline, so they tear or pop out under a child's weight. Treat any window with a screen as an open window, and rely on protection from a lock, restrictor, or guard instead.
What is the difference between a window restrictor and a window guard?
A restrictor limits how far the sash can travel, so the window opens only to a set gap. A guard is a barrier fitted across the opening, similar to a gate, and the window can open fully behind it. Restrictors suit most everyday ventilation, while guards suit upper-storey windows where a barrier fits the room better.
Will a child safety device stop us from escaping in a fire?
It should not. Any device on a window intended for emergency escape must release quickly for an adult or older child without tools or a key. Look for devices tested to ASTM F2090, practise the release after installation, and make sure every caregiver knows how it works.
At what age do children stop being at risk from windows?
The highest risk sits with toddlers and preschoolers, but it does not end on a birthday. Children often begin climbing before they walk, and a growing child reaches handles that were out of range a few months earlier, so reassess each room as their mobility and height change.
Do I need to replace my blinds if they have cords?
Health Canada advises that the safest window coverings have no cords you can see or touch, and recommends replacing corded coverings with cordless options starting with children's bedrooms and play areas. Until then, keep cords high and out of reach and keep cribs, beds, and chairs away from them.
Can childproofing hardware be added to any window?
Most windows accept some form of device, but not all. Frames that have rotted, warped, or lost their fasteners cannot securely anchor a restrictor, and some older units have no compatible hardware available. In those cases, an assessment of the window itself is the safer path.

1000’s of Colours & Textured Finishes
Transform your home from ordinary to extraordinary with our new coloured and non-glare textured finishes. Available in a wide array of colours as well as custom matched colours for your very own personalized design.
Our Most Popular Replacement Window Colours: