What Are Weep Holes in Windows and Why You Should Never Block Them


Weep holes are small drainage openings at the exterior base of a window frame that allow rainwater and condensation to drain to the outside. You should never block them because sealing that path traps water inside the frame rather than keeping it out.
If you have noticed water sitting in a window track, a stain near the sill, or a faint musty smell after heavy rain, the cause is often a blocked drainage path rather than a defective window. Understanding how weep holes work, how to keep them clear, and where to apply caulk will help you protect your frames, walls, and insulation over the long term. This guide walks through both the how and the why in plain language, so you can tell a routine maintenance task apart from a problem that needs a closer look.
Key takeaways
- Weep holes are purpose-built drainage openings, usually along the exterior bottom of the frame, and some systems also include interior drainage openings within or beneath the track.
- Water reaches the track, follows the sloped sill, and exits through the weep holes; the openings are the frame's exit path, not a defect.
- Never seal weep holes with caulk, paint, or debris. Blocking the drainage path traps water and can damage surrounding building materials.
- Warning signs of blockage include standing water, staining, and musty odours. A simple water test tells you whether drainage still works.
- Drainage demands vary by climate, so wetter and freeze-and-thaw regions require more frequent checks than drier ones.
- Clean gently with a narrow tool, retest, and call a professional if leaks continue, channels are damaged, or an installation fault is suspected.
What are window weep holes, and where can you find them?
Window weep holes are small openings, often rectangular or oval, that allow water to drain out of the frame rather than pool inside it. Most sit along the exterior bottom of the sill, and many systems add a second, interior opening within the track.
At Canadian Choice Windows & Doors™, weep holes are described as small openings at the bottom of exterior frames that allow water to drain away from the sill track. The Building America Solution Center from PNNL adds useful detail by illustrating both locations: an exterior weep hole on the outer face of the bottom rail, and an interior weep hole in the track or just beneath it. Knowing that a window can drain in two places matters, because a homeowner who only checks the outside may miss a second opening that also needs to stay clear. Inside the frame, a modern window is essentially a hollow chamber, and these openings give any water that collects there a way back out before it can build up.
Common weep-hole locations
On most modern windows, you will find the exterior openings low on the outside face of the bottom rail, frequently one near each corner. The interior opening, when present, sits inside the track where you can see it with the sash open, or tucked beneath the track itself. Because the layout varies by product, it helps to look in both places rather than assuming a single opening does all the work. If nothing is visible outside, look closely, since a previous owner may have painted or caulked the slot over without realizing what it was.
What the openings look like
Weep holes are deliberately small, so they are easy to overlook. Exterior openings usually read as narrow slots a few millimetres wide, sometimes fitted with a small hinged flap or cover that limits debris while still letting water pass. Interior openings tend to be even less obvious, appearing as a modest hole or gap in the track. None of these should be treated as a manufacturing gap to be filled. They are engineered features, and their small size is exactly what allows them to shed water without letting much air or weather through. Once you know what to look for, they are easy to find on almost any window in the house.

How do weep holes in windows move water safely outside?
Weep holes move water in a simple sequence: rain or condensation reaches the track, travels along the drainage channel, follows the sloped sill toward the exterior, and exits through the openings before it can build up inside the frame.
The water path through the frame
When rain drives against the glass or snow melts on the frame, a small amount of water finds its way into the drainage chamber inside the window. This is normal and expected. The frame is built to collect that water in the bottom track rather than let it wander into the wall. From there, the water needs a clear route out, and that route ends at the weep holes. PNNL describes these openings as the pathway that carries water from the frame or tracks to the outside, which is precisely the job they are designed to do. When the path is open, incidental water quickly and quietly leaves the frame, and you may never even notice it.
The role of the sill and drainage channel
The sill is not perfectly flat. Canadian Choice describes a sloped sill that guides water toward the weep holes, and that gentle grade is what turns a puddle in the track into a steady drain to the exterior. The drainage channel behind and below the track feeds water toward the openings so it does not sit against seals and glazing. This is why blocking a single small hole can undo the whole system: the sill and channel keep moving water toward an exit that is no longer there. Keeping that exit clear lets the frame do what it was engineered to do: manage water quietly and continuously without any effort on your part.
Why should you never block window weep holes with caulk, paint, or debris?
You should never block weep holes because sealing the drainage path traps water inside the frame rather than keeping water out. Caulk, paint, or packed debris turns a working drain into a dam, and the water has to go somewhere.
This is one of the most common and costly mistakes homeowners make. Canadian Choice specifically warns homeowners not to caulk the weep holes or the bottom drainage path, and PNNL notes that when openings are clogged or accidentally caulked, trapped water can accumulate within the frame and eventually damage the framing, sheathing, insulation, and other building materials. In other words, the harm is not limited to the window itself. Sealing the wrong opening can move a moisture problem straight into the wall assembly, where it is far harder and more expensive to fix than a simple clog would ever have been.
"Homeowners often assume every gap is a flaw to seal, so part of our job is explaining which openings are meant to stay open. When we hand over a window, we point out the weep holes and the bottom drainage path and ask people to keep them clear. That small piece of guidance prevents the water problems we would otherwise be called back to solve." Helen Sin, Consumer Success Manager at Canadian Choice Windows & Doors™
Why caulking creates problems
Caulk is meant to close joints where two materials meet, such as the seam between the frame and the siding. A weep hole is the opposite kind of feature: an intentional opening that must stay open. When homeowners run a bead of caulk along the bottom of the sill to stop a suspected draft or whistling in high winds, they often accidentally seal the drainage path. The window may feel tighter for a season, but the next heavy rain has nowhere to drain. The result can be standing water, deteriorating seals, and eventually damage to the surrounding materials. Sealing the perimeter is useful; sealing the drainage route is not, and the difference between the two is easy to miss if no one points it out.
How a small blockage becomes a wall problem
It helps to picture where the trapped water actually goes. Once the exit is sealed, water rises in the frame until it finds the next-easiest path, which is usually inward toward the interior finishes and the wall cavity behind them. From there, it can wet the framing, sheathing, and insulation that PNNL identifies as vulnerable, and those materials dry slowly once they are soaked. A blocked drain the size of a grain of rice can therefore lead to repairs that involve opening a wall. That is the real reason the rule is stated so firmly: the cost of a mistake is out of all proportion to the size of the opening.
Common accidental blockages
Not every blockage is caused by caulk. Over time, weep holes can clog with dirt, pollen paste, insect nests, cobwebs, or paint overspray from a nearby project. A missing or cracked weep-hole cover makes clogging more likely, because debris drifts in more easily. The openings are small by design, so it does not take much to close them. That is why a quick seasonal check matters more than any single deep clean: catching a partial blockage early keeps it from becoming a full one that pushes water back into the frame and, eventually, into the wall.
What can happen when the drainage openings become clogged?
When drainage openings clog, water that would normally exit the frame backs up. In the short term, you may see standing water and staining; over time, trapped moisture can migrate into nearby materials, causing lasting damage.
It helps to separate the early, surface-level symptoms from the slower consequences that follow if a blockage is left in place. The list below groups them so you can tell a simple maintenance issue apart from a deeper problem that needs investigation:
- Short-term symptoms: standing water in the track, water stains near the sill, and musty odours, all of which Canadian Choice identifies as warning signs of compromised drainage.
- Longer-term consequences: moisture migration into surrounding materials, deterioration of seals and glazing, and potential effects on the window's performance.
There is an important distinction here. A one-time blockage that clears easily and drains normally afterward is a maintenance item you can usually handle yourself. Water that keeps appearing indoors after cleaning, or staining that spreads, points to something more than a clogged slot and deserves a closer look. Treating every damp track as a disaster is unhelpful, but so is ignoring a recurring symptom. The goal is to read the signs correctly and respond in proportion to them, rather than either panicking or waiting until the damage is visible from inside the room.
How can you tell whether your window weep holes are blocked?
You can tell your weep holes are blocked by locating the exterior openings, checking them for dirt or caulk, inspecting the track for standing water, and testing whether water can still exit. A short, hands-on inspection quickly answers the question.
Visual warning signs
Start with what you can see. Find the openings on the outer face of the bottom rail and look for anything covering them, such as packed dirt, paint, or a caulk line. Open the window and check the track for water that is sitting rather than draining. Stains at the base of the frame or a musty smell are additional clues that water has been lingering where it should not. None of these on its own proves a blockage, but together they build a clear picture of whether drainage is keeping up with the weather your windows face.
A simple drainage test
The most direct check is a controlled water test. PNNL recommends introducing a small, measured amount of water into the track and watching whether it comes through the weep hole on the outside. Pour a little water into the bottom track, then step outside and confirm it drains freely from the exterior openings. If the water flows out cleanly, the path is clear. If it pools in the track and does not appear outside, one or more openings are blocked and need attention. This test takes only a minute and removes the guesswork, so you are acting on what the window actually does rather than on assumption.
Do all window styles use the same type of weep-hole drainage?
Not all window styles drain the same way. Sliding and hung windows commonly use visible weep slots; casement and awning units may rely on less obvious drainage arrangements; and fixed picture designs can differ again, so the right approach is to follow the specific design rather than expecting a slot on every window.
The table below compares how drainage typically works across common styles and what to check on each. Use it as a starting point, and always defer to your manufacturer's design rather than adding or modifying openings:
| Window style | How drainage usually works | What to check |
|---|---|---|
| Sliding windows | Commonly use visible weep slots along the exterior base of the sill track. | Keep the bottom track and exterior slots clear of dirt and debris. |
| Single and double hung | Water collects in the bottom track and exits through slots on the outer frame. | Look for two openings, usually one near each lower corner. |
| Casement and awning | Often use less visible drainage arrangements built into the frame profile. | Follow the maker's design; drainage may not look like an obvious slot. |
| Fixed picture windows | Sealed designs can differ; some rely on the surrounding assembly to shed water. | Do not add or drill openings; confirm the design with the manufacturer. |
The practical takeaway is consistency of care rather than uniformity of design. Whatever the style, the aim is the same: keep the intended drainage path clear and resist the urge to drill new holes or seal existing ones. A casement that drains differently from a slider is not faulty; it is simply built to a different pattern. Horizontal sliding windows make the point well, since their movable sashes ride in a track that naturally collects a little water, and their exterior drainage flaps are designed to direct that water away from the panes. Understanding how your particular style manages water tells you exactly what to keep clear.
How can you caulk around a window without accidentally sealing its drainage system?
You can caulk safely by sealing the perimeter joints intended to be weatherproof, while leaving the weep holes and the bottom drainage path completely open. The difference between a good seal and a trapped-water problem comes down to which lines you fill and which you leave alone.
Canadian Choice covers this directly in its window caulking guide , which instructs homeowners to keep the bottom drainage route and weep holes open while sealing the rest of the perimeter. The principle is easy to hold in mind: caulk belongs where two surfaces meet, and water should not get in, not across an opening that water is supposed to get out of. Getting this right the first time avoids the most common do-it-yourself mistake in window sealing and keeps a job that should improve comfort from quietly creating a moisture problem instead.
Areas that may require sealant
The perimeter where the frame meets the siding or brick is the right place for caulk. Sealing the sides and top of the exterior joint keeps wind-driven rain from working its way behind the cladding, and a tidy interior bead closes gaps around the trim. These are genuine weatherproofing tasks, and doing them well improves comfort and reduces drafts. The key is to treat the perimeter and the drainage path as two separate systems that happen to sit close together, and to keep them clearly apart in your mind before the caulking gun comes out.
Areas that must remain open
The bottom of the exterior sill and the weep holes themselves must stay open. This is the single most important rule of window caulking, and it is the one most often broken. Water that enters the frame during a storm needs the bottom route to escape, so a bead run across the sill or over the slots turns drainage into a trap. Before you seal anything, identify the openings so you know exactly where not to caulk. If you are unsure whether a line is a joint or a drainage path, leave it open and check the manufacturer's guidance rather than guessing.
DIY caulking mistakes to avoid
Beyond sealing the drainage path, a few other errors cause trouble. Applying fresh caulk over old, failing caulk rarely bonds well, so the new bead lifts and cracks within months; removing the old material first is worth the effort. Using too much sealant can bridge gaps that should breathe, and rushing the job in cold or damp conditions weakens adhesion. Done carefully, perimeter caulking is a helpful maintenance task. Done hastily, it can seal the very openings that protect your window, which is why patience and a clear plan matter more than speed.
How should you clean clogged weep holes without damaging the window?
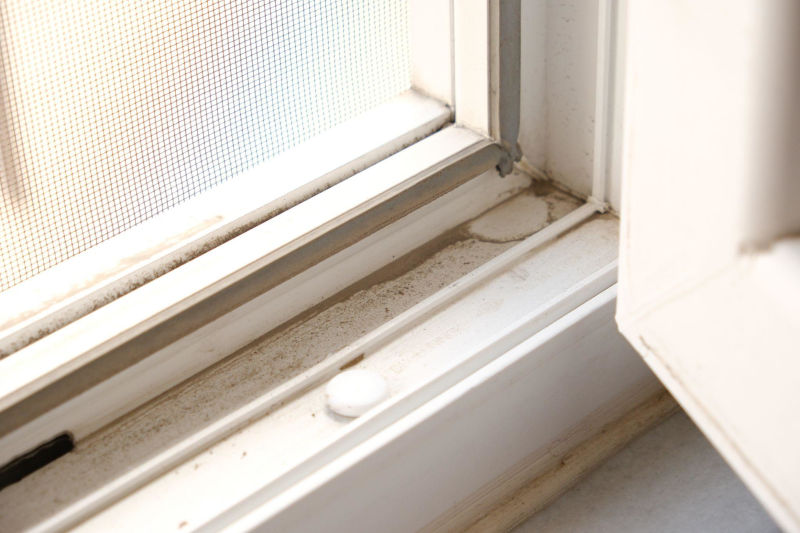
Clean clogged weep holes by gently clearing debris with a small brush, pipe cleaner, or suitable narrow tool, taking care not to push material deeper into the channel, and then retesting drainage to confirm the path is open.
PNNL sets out a straightforward locate, check, clean, and retest procedure, and following that order keeps the job simple and low-risk. The steps below adapt it for a typical vinyl window:
- Locate the exterior bottom openings of the frame and, if the window has one, the interior opening in or beneath the track.
- Clear the exterior slot gently with a small brush, a pipe cleaner, or a thin hook, working debris outward rather than inward.
- Clean the drainage channel and interior opening the same way, so the whole path is open from track to exterior.
- Retest with a little water poured into the track, and confirm it drains freely from the outside before you finish.
The one thing to avoid is force. Pushing a stiff tool hard into the opening can drive debris further into the channel or mar the frame, which defeats the purpose. Gentle, patient clearing followed by a quick retest is all most windows need. If the openings clog again quickly, that is a sign to look at covers, screening, or the surrounding conditions rather than simply cleaning more often. A weep hole that fills with debris within weeks is telling you something about its environment that a repeat cleaning alone will not solve.
Why does window drainage matter more in some Canadian climates?
Window drainage matters more wherever windows face frequent rain, snowmelt, or repeated freezing and thawing, because those conditions push more water into the frame more often. The wetter and more changeable the weather, the harder your weep holes work.
Canada's climates are not uniform, and neither are the drainage demands they place on a window. A coastal home and a prairie home can own the very same window and still need different maintenance habits, simply because the water arrives in different amounts and at different times of year. The comparison below is not about which region is harder on windows overall, but about how the water actually behaves, since that is what determines how often the openings need attention:
- Coastal rain: in a wet coastal setting, window drainage in Vancouver contends with long stretches of rain that keep frames damp and increase the chances of debris washing into the openings.
- Freeze and thaw: across the prairies, windows in Calgary face rapid temperature swings and repeated freeze-and-thaw cycles, so water that lingers in a partly blocked track can freeze, expand, and stress the frame.
- Mixed seasons: in southern Ontario, window replacement in Hamilton deals with a mix of humid summers, heavy rain, and winter snowmelt, which spreads the drainage workload across the whole year.
The practical lesson is to match your maintenance rhythm to your weather rather than to a single national rule. A drier region may need only the occasional check, while a rainy coast or a freeze-and-thaw climate calls for more frequent inspections of exterior openings, especially after storms and during snowmelt. The window is the same; the water it has to manage is not. Tuning your attention to local conditions is one of the simplest ways to ensure reliable drainage over the long term.
H2: Can weep-hole covers keep insects out without stopping drainage?
A properly designed weep-hole cover can help keep insects and debris out while still allowing water to escape from the window frame. The important difference is whether the cover protects the opening without obstructing the drainage path.
H3: The purpose of covers
Some manufacturers fit small hinged flaps or covers over exterior weep holes to reduce the amount of dirt and insects entering the opening. These covers are designed to allow water to pass through while limiting access for pests. Where a factory flap is intact, check that it moves freely and has not become stuck with dirt, paint, or debris. A fine mesh insert can also be used on compatible window systems to help keep insects out without closing the drainage opening.
H3: What not to use as a substitute
The mistake to avoid is replacing a proper cover with an impermeable material. Tape, caulk, expanding foam, or solid filler may keep insects out, but they also block the drainage path and can trap water inside the frame. If a factory cover is missing or damaged, use a purpose-made replacement that is designed for the window system rather than sealing the opening with whatever material is available. The rule is simple: protect the weep hole without closing it.
How often should homeowners inspect weep holes in windows?
Homeowners should fold a quick drainage check into their regular window maintenance, paying particular attention around periods of heavy rain, snowmelt, and seasonal cleaning. Think of it as light, routine upkeep rather than a fixed manufacturer schedule.
Canadian Choice frames regular inspection as good practice and, in its regional drainage guidance for wetter climates, discusses cleaning weep holes about twice a year. That cadence works well as a general habit: a look in spring and again in fall catches most debris before it hardens into a blockage. Local conditions matter, though, as the climate comparison above makes clear, so a home in a rainy or freeze-and-thaw region may benefit from more frequent checks than a drier one. The idea is to build the habit around the weather your windows actually face.
A seasonal inspection routine
A simple seasonal routine keeps drainage reliable without much effort. In spring, clear away the debris that accumulated over winter and confirm the openings drain after snowmelt. In fall, clean out leaves, pollen, and insect nests before the wet season sets in. Around any major storm, a quick glance at the exterior openings tells you whether they are keeping up. Building the check into work you already do, such as washing the windows, means it rarely feels like an extra chore, and it protects the investment you made when you first arranged professional window installation .
What to check each time
Each inspection can follow the same short list, which keeps it fast and thorough. Confirm the exterior openings are clear and free of caulk or paint, check the track for standing water, and run a quick water test if anything looks off. Note whether any covers or flaps are missing or cracked, as these can increase the likelihood of future clogging. Consistency is what makes the routine effective: the same handful of checks, done a couple of times a year, prevents the slow build-up that leads to trapped water and the damage that follows.
Is water in a window track always a sign that the window is leaking?
Water in a window track is not always a sign of a leak. An engineered exterior track is designed to collect and drain a small amount of incidental water, so the real question is whether that water leaves the frame as intended or escapes into your interior finishes and wall.
Normal drainage behaviour
A little water in the bottom track after wind-driven rain is often a sign the system is working as designed. The track collects incidental moisture, the sloped sill guides it toward the weep holes, and it drains outside. If the water disappears on its own and the track is dry again once the weather clears, the frame is doing its job. This is why a damp track by itself is not cause for alarm. The frame is meant to get wet in that one controlled location and then shed the water back outdoors, quietly and without help.
Signs of an actual problem
The picture changes when water shows up where it should never be, or when it will not drain at all. Persistent water on the interior sill, staining that spreads onto the wall, or a track that stays full long after the rain has stopped all point to a genuine problem rather than normal drainage. The distinction is straightforward once you know what to look for:
- Likely normal: a small amount of water in the exterior track that drains out through the weep holes and leaves the track dry.
- Worth investigating: water reaching interior finishes, recurring staining, or a track that will not drain after confirming the openings are clear.
Reading this correctly saves both worry and money. Functioning drainage is meant to move incidental water outward, and seeing it do so is reassuring rather than alarming. Water that escapes into the home, on the other hand, warrants prompt attention before it affects the surrounding structure, and it usually indicates something beyond a clogged slot.
When does a drainage problem mean you should call a window professional?
Call a window professional when a drainage problem goes beyond a removable surface blockage, such as indoor leakage that continues after cleaning, damaged drainage channels, deteriorated seals, recurring staining, or a suspected installation fault. A clogged slot you can clear is routine; these signs are not.
The dividing line is whether the issue is a basic maintenance issue. If you clean the openings, retest, and water still reaches the interior, the problem lies deeper than debris. Cracked or crushed drainage channels, failed seals, and recurring staining all suggest something that needs a trained eye. It is also worth resisting the temptation to drill new openings or alter the frame; PNNL's guidance supports cleaning existing drainage paths, not redesigning the window system, and modifying a frame can compromise both its performance and its warranty protections.
"By the time a channel is damaged, or an installation detail has failed, cleaning alone will not fix it, and drilling new holes usually makes things worse. What we look for is where the water is actually getting in, then we correct the drainage or the seal at the source. Homeowners get the best result when they clear the simple blockages themselves and bring us in for anything that persists." Tony Wong, Project Manager at Canadian Choice Windows & Doors™
Problems you can inspect yourself
Plenty of drainage issues are well within a homeowner's reach. Clearing debris or paint from the openings, checking the track for standing water, running a water test, and replacing a missing weep-hole cover are all straightforward tasks that need no special tools. If one of these solves the problem and the window drains normally afterward, there is no need to call anyone. Handling the simple cases yourself is not only cheaper but also faster, and it keeps small issues from being mistaken for big ones.
Signs professional diagnosis is warranted
Some symptoms signal that it is time for professional help. Water that continues to enter the home after you have cleaned and retested the openings, visible damage to the drainage channels, deteriorated seals, and recurring stains all warrant diagnosis rather than another round of cleaning. A suspected installation problem falls into the same category because the fix usually involves how the window meets the wall rather than the window itself. If you are weighing whether new units are the more reliable long-term answer, our tips for replacing windows can help you think it through. Replacement is not always necessary, but where a frame is compromised, it is often the most dependable path.
Weep holes at a glance
The reference table below brings the essentials together, covering the purpose of weep holes, the signs of a blockage, safe cleaning, the caulking rule, and when to bring in a professional. Use it as a quick refresher before inspecting or sealing a window.
| Topic | What to remember |
|---|---|
| Purpose | Weep holes are built-in drainage openings that allow incidental water to drain out of the frame. |
| Blockage signs | Standing water in the track, staining, or musty odours point to compromised drainage. |
| Safe cleaning | Gently clear openings with a small brush or pipe cleaner, then retest with a little water. |
| Caulking rule | Seal perimeter joints only; never caulk the weep holes or the bottom drainage path. |
| When to call a pro | Get help for leaks that persist after cleaning, damaged channels, or suspected install faults. |
How to Keep Your Window Weep Holes Working and Prevent Moisture Problems
Weep holes are intentional drainage components, not defects or gaps that should be sealed. They give the small amount of water that enters a window frame a clear route back outside, and keeping that route open is one of the simplest things you can do to protect your frames, walls, and insulation. Clearing debris a couple of times a year, testing drainage with a little water, caulking only the perimeter, and adjusting your checks to suit your local climate will keep most windows performing well for the long term.
If your windows keep trapping water after you have cleared the openings, or if the frames themselves are showing their age, it may be time to consider a more reliable solution. To talk it through with a Canadian team that builds and installs for Canadian climates, book a no-pressure consultation with Canadian Choice Windows & Doors™ whenever you are ready.
Frequently asked questions
Do all windows have weep holes?
Many modern windows have weep holes, but not all of them drain in the same visible way. Sliding and hung windows commonly show slots on the exterior sill, while casement, awning, and fixed picture windows may use less obvious drainage built into the frame. If you cannot find an opening, look closely for one that has been painted or caulked over, and check the manufacturer's design before assuming there is none.
Is it ever okay to caulk a weep hole?
No. Weep holes are intentional drainage openings, and sealing them with caulk traps water inside the frame. You can and should caulk the perimeter joints where the frame meets the siding, brick, or interior trim, but the weep holes and the bottom drainage path must stay open so water can exit.
Why is water sitting in my window track?
A small amount of water in the exterior track after rain is often normal, because the track is designed to collect incidental water and drain it through the weep holes. If the water will not drain, the openings may be blocked. If water reaches the interior sill or the wall, that points to a genuine problem worth investigating.
Can blocked weep holes cause mould?
Blocked drainage can lead to standing water and moisture migration, and persistent dampness around windows can contribute to mould growth over time. Keeping the openings clear and drying up recurring interior moisture reduces that risk. Where dampness keeps returning despite clean weep holes, it is worth having the cause diagnosed rather than treating only the symptom.
What is the fastest way to check whether my weep holes are working?
Pour a small amount of water into the bottom track, then step outside and watch the exterior openings. If the water drains out freely, the path is clear. If it pools in the track and does not appear outside, one or more openings are blocked and need gentle cleaning.

1000’s of Colours & Textured Finishes
Transform your home from ordinary to extraordinary with our new coloured and non-glare textured finishes. Available in a wide array of colours as well as custom matched colours for your very own personalized design.
Our Most Popular Replacement Window Colours: