Legal Basement Window Size: Ensuring Safety and Compliance

Most Canadian basement bedroom windows must provide at least 0.35 m² (3.77 sq. ft.) of unobstructed opening space to meet modern egress code requirements. However, in real projects across Toronto, Calgary, Halifax, Edmonton, and other Canadian cities, we regularly see older basement windows that technically fail current safety standards due to restricted opening width, window wells, or outdated frame designs.
This guide explains the current Canadian egress window requirements, common sizing mistakes homeowners make, and what we typically see when upgrading older basements to modern code compliance — while still maintaining energy efficiency, natural light, and practical basement design.
Key Takeaways
- Most Canadian basement bedrooms require an egress window that meets modern building code standards for emergency escape.
- The minimum unobstructed opening is typically 0.35 m², with no dimension smaller than 380 mm.
- In older Canadian homes, the existing basement window often looks large enough but fails code because of frame thickness, restricted opening space, or outdated hardware.
- Window wells are just as important as the window itself. Poor drainage or limited clearance can create safety and inspection issues.
- Local building requirements may vary by province or municipality, especially for basement renovations and secondary suites.
- In many retrofit projects, homeowners need enlarged openings, new window wells, or structural adjustments to achieve full compliance.
- Based on our experience across multiple Canadian regions, basement egress upgrades are most successful when safety, insulation, and drainage are planned together — not treated as separate upgrades.
What Is an Egress Window — and Why It Matters
An egress window is a specially designed window that serves as a legal and safe emergency exit point from a building. Building codes across Canada require egress windows in specific living spaces — especially in basements — to protect occupants in the event of a fire or other emergency.
Unlike regular windows, an egress window must allow a person to exit quickly and enable emergency responders to enter the space from outside if needed. To meet safety and code requirements, it must be:
- Large enough for easy escape: The opening must meet specific minimum width and height dimensions so an average adult can pass through without restriction.
- Installed low enough for access: The bottom of the opening should be positioned close enough to the floor to be reachable without climbing on furniture or using tools.
- Operable without special tools or knowledge: The window should open easily by hand from the inside, without the need for keys, extra effort, or complex mechanisms that could impede an escape.
In short, an egress window is more than just a source of natural light — it’s a life-saving safety feature that ensures every living space has a reliable emergency exit.

“Homeowners often underestimate the importance of egress sizing. A correctly sized basement window doesn’t just ‘meet code’ — it provides a safe, accessible exit when it matters most,” explains Helen Sin, Consumer Success Manager at Canadian Choice Windows & Doors™ .
Canadian Code Baseline (NBC) for Basement Egress Windows
The National Building Code of Canada (NBC) sets the baseline for egress in dwelling units. Provinces adopt the NBC (often with amendments). Core metrics:
- Unobstructed Openable Area: ≥ 0.35 m² (3.77 ft²).
- Minimum Dimension: ≥ 380 mm (15 in) in both width and height of the clear opening.
- Maximum Sill Height: ≤ 1.5 m (4.9 ft) above the finished floor.
- No Obstructions: Grilles, divided lites, sash thickness, and hardware must not reduce the clear opening below the required values.
- Operation: The window must be openable without keys, tools, or special knowledge—security bars—only with an interior quick-release.
Provincial & Municipal Variations
Always verify with your local building department; fines and rework for non-compliance are common.
| Jurisdiction | Baseline | Notes |
|---|---|---|
| Ontario (OBC) | Follows NBC | Stricter oversight for secondary suites; ensure window wells and clear-opening math align with local inspections. |
| British Columbia (BCBC) | NBC-aligned | Local wildfire and smoke provisions may affect fenestration details in some zones. |
| Alberta (ABC) | NBC-aligned | Emphasis on weather and drainage in below-grade wells. |
| Municipal bylaws | Vary | May refine sill heights, well geometry, guard/cover rules, and heritage overlays. |
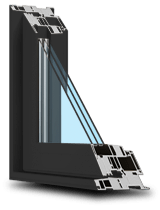
Which Basement Window Types Can Qualify for Egress
Suitability depends on the clear opening with the sash fully open — not the nominal size.
| Window Type | Egress-Suitable? | Why / Why Not |
|---|---|---|
| Casement | Often best | Sash swings clear; easiest to achieve ≥ 0.35 m² with ≥ 380 mm min dimensions. |
| Horizontal Slider | Sometimes | Only the openable half counts; choose larger units to reach the required clear area. |
| Single-Hung | Sometimes | The movable sash defines the opening; it may need oversizing. |
| Hopper (inward) | Generally no | Can obstruct the escape path; may conflict with the well space. |
| Awning (top-hinged) | Generally no | Hinges can restrict passage; often not accepted for bedrooms. |
“In retrofits, we see windows that look big enough but fail once the clear opening is measured. Only the unobstructed opening counts — not the frame or sash,” notes Tony Wong, Project Manager at Canadian Choice Windows & Doors™ .
How to Measure the Clear Opening
- Fully open the window in its egress position.
- Measure the clear width (the narrowest passable width).
- Measure the clear height (the narrowest passable height).
- Calculate area: width × height must be ≥ 0.35 m².
- Verify min dimensions: width and height ≥ 380 mm.
- Confirm sill height: ≤ 1.5 m above finished floor.

Sample Calculations (Metric)
- Pass: 400 mm × 875 mm = 0.35 m² (meets both min dimension and area).
- Pass: 560 mm × 625 mm = 0.35 m².
- Fail (area): 380 mm × 880 mm = 0.334 m² (min dimension okay; area too small).
- Fail (dimension): 350 mm × 1200 mm = 0.42 m² (area ok; dimension < 380 mm → not compliant).
Common Measurement Errors
- Measuring glass size instead of clear opening.
- Ignoring sash/hardware intrusions into the opening.
- Using nominal unit size from a brochure instead of on-site, precise measurements.
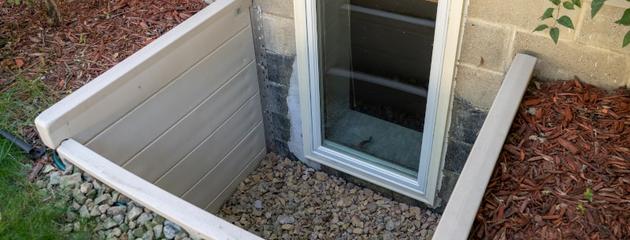
Window Wells: Size, Access & Drainage
When installing an egress window below ground level — commonly for basement bedrooms or living spaces — you must create a window well that is appropriately sized. This well must provide enough space for a person to escape quickly and for emergency personnel to enter if needed, while also managing water and snow. Here’s what to consider:
Well Width and Projection
The window well must be broad and deep enough to allow the window sash to fully open without obstruction and to provide a person with sufficient space to move and climb out safely.
- Most Canadian building authorities (AHJs) recommend a minimum of about 900 mm (≈ 36 inches) of clear width and projection in front of the window.
- This space prevents people from becoming trapped and ensures rescue crews can access the window from outside.
Well Depth and Access Ladder
If the bottom of the window well is deeper than about 1100 mm (≈ 44 inches) below grade, a permanent means of escape must be installed.
- This can be a securely attached ladder or built-in steps.
- The ladder should be reachable from the window opening and sturdy enough to support an adult’s weight.
Steps or rungs should be spaced for easy climbing, typically 300 mm (12 inches) apart or less.
Covers and Guards
Window well covers or grates are often used to prevent debris, snow, or accidental falls. However, they must not interfere with emergency egress.
- Covers should be easy to open from the inside without the need for tools or special knowledge, even for children or older adults.
- They must be strong enough to support the weight of snow, ice, or a person stepping on them.
- Avoid any locking mechanisms that could delay an emergency escape.
Drainage and Moisture Control
Because the well sits below grade, proper drainage is critical to prevent flooding and ice build-up.
- Install a gravel base beneath the well and connect it to the foundation’s drain tile system or a sump pit if possible.
-
The surrounding soil should slope away from the house to divert surface water.
En - Ensure that the well is sealed to the foundation to prevent water ingress during freeze-thaw cycles.
Planning for Snow-Prone Regions
In areas with heavy snow accumulation, window wells require additional forethought.
- Provide extra horizontal clearance to prevent snow buildup from blocking the window from opening fully.
- Allow space for easy seasonal maintenance, such as clearing ice or snow after a storm.
- Choose well materials that resist corrosion and damage from freeze-thaw conditions.
A properly designed and installed window well ensures that your below-grade egress window remains safe, code-compliant, and functional in all seasons, providing occupants with reliable emergency access while protecting your basement from water damage.

Retrofitting Older Homes (What to Expect)
Assessment
Inspect the foundation wall for cracks or structural weaknesses. Confirm exterior grading slopes away from the house. Locate and mark nearby gas, electrical, plumbing, and HVAC lines to avoid damage during cutting.
Design
Choose an egress window style that provides a large, clear opening (typically a casement window). Calculate clear width × height ≥ 0.35 m² and ≥ 380 mm each side. Plan the window well's size, depth, and ladder placement if it is below grade.
Structure
Cut or enlarge the wall opening carefully. Install a structural lintel or header to carry the load above. Protect or reroute any nearby utilities. Excavate for the window well and provide temporary shoring to prevent soil collapse.
Moisture Management
Maintain drainage plane continuity. Install a sloped sill pan, apply flashing around the frame, and seal all joints to prevent water from entering. Tie the healthy base into gravel and drain tile to prevent water buildup and ice damage.
Permitting & Inspection
Submit permit drawings with structural, drainage, and safety details. Expect inspections after framing (lintel), after waterproofing, and at project completion to confirm code compliance.
Energy Efficiency for Basement Egress Windows
- Glazing: Double or triple glazing with Low-E coatings balances heat loss with the benefits of natural light.
- Frames: Insulated vinyl or fibreglass frames reduce thermal bridging; consider warm-edge spacers.
- Air-Sealing: Continuous air barrier, backer-rod + sealant, and foam insulation in the cavity.
- Ratings: Look for CSA/ENERGY STAR Canada labels that are appropriate for your climate zone.
Safety & Accessibility Essentials
- Operation: Openable by children and older adults without tools or keys.
- Security Bars: Allowed only with interior quick-release mechanisms; test regularly for proper operation.
- Exterior Access: Keep wells clear of storage, plants, or snow that could impede access for responders.
Installation Best Practices
Sill Pan & Flashing
Install a sloped sill pan under the egress window to direct water outward. Integrate flashing tape with the wall’s weather-resistive barrier (WRB), lapping it properly to maintain the drainage plane.
Plumb / Level / Square
Set the window perfectly square in the rough opening using shims. Verify with a level and tape measure to ensure smooth sash movement and a full, clear opening.
Insulation & Air-Seal
Fill perimeter gaps with low-expansion foam or mineral wool in an even manner. Avoid over-expanding foam that can cause the frame to bow or distort, thereby reducing the opening size.
Hardware & Stops
Install and adjust hardware so the sash opens fully to the egress position. Ensure any safety stops are positioned to allow the code-required precise opening dimensions.
Commissioning
Operate the window several times to confirm smooth function. Measure the clear width, height, and area after installation, and photograph manufacturer labels for inspection records.
Permits, Inspections & Documentation
- Permit: Required for new openings, enlargements, and secondary suites.
- Inspections: Structural, waterproofing/well, and final; the AHJ may verify a clear opening on-site.
- Records: Keep approvals, labels, and photos — often needed for insurance and resale.
Common Mistakes to Avoid
- Assuming any “big” window qualifies without clear-opening math.
- Choosing awning/hopper styles for bedrooms.
- Under-sized or undrained window wells that flood or freeze.
- Skipping permits/inspections, risking fines and rework.
- DIY enlargements without structural design.
FAQs
Can a slider count as egress?
Yes — if the fully opened sash provides ≥ 0.35 m² with no dimension < 380 mm, and the sill is ≤ 1.5 m.
Do all basement rooms need egress windows?
Bedrooms do. Other rooms may not, but additional exits are recommended.
Are the rules identical across Canada?
No. The NBC is the baseline; provinces and municipalities can tighten requirements.
Can I install security bars on an egress window?
Only with an interior quick-release mechanism that is operable without tools or keys.
What about heritage homes?
Work with the AHJ early; solutions often combine casement egress, discreet well design, and interior trim that respects original character.
Conclusion
Meeting legal basement window size requirements is fundamental to occupant safety, code compliance, and long-term value. The ideal egress solution combines clear-opening performance, effective sound design, energy efficiency, and professional installation.
At Canadian Choice Windows & Doors™, we help homeowners evaluate options, navigate permitting, and install code-compliant egress windows built for Canadian climates.
Book a Free Consultation — get a clear-opening check, retrofit plan, and a solution aligned with your home and local code.

1000’s of Colours & Textured Finishes
Transform your home from ordinary to extraordinary with our new coloured and non-glare textured finishes. Available in a wide array of colours as well as custom matched colours for your very own personalized design.
Our Most Popular Replacement Window Colours: